Thursday, October 23, 2014

He's a cat!

Look at him. Seriously. Look at that adorable little bastard. He's so fat, but he wants to be in the box, so in the box he is.

That's Sammy. AKA Sammers, The Notorious S.A.M, Sammalammadingdong, Sammerdo, and sometimes, Jerkface Magee.
Sammy is 11. Not super old for a cat. Certainly not old enough that I thought he'd be dealing with serious health issues. But there it it. Last month I noticed he'd lost a good bit of weight. He's been a big guy all his life, at one point topping the scales at 20lbs, so for me to be able to feel, well, any of his bones, I knew it wasn't a good sign. He wasn't eating either, which has happened exactly zero times for him.
To the vet we went, where we learned he'd lost 3 lbs in a month (he'd had his checkup the month prior). Bloodwork was run and we discovered his liver wasn't functioning well. We started antibiotics and liver supplements and I began feeding him wet food. With an appetite stimulant, he began eating once more. In two weeks, I felt he'd gotten better. I could no longer feel his hip bones and eat vertebrae. We took more blood and learned that, while still not in the normal range by far, his liver was working better.
I thought we were out of the woods, but he's stopped eating again. Hepatic Lipidosis is what we're deciding on. His fatness has worked against him in life despite my best efforts to get him to lose weight.
So what do we do now? I have two kids, I stay home. We can't afford to spend ridiculous amounts of money on him. After all, he's just a cat, right?
Nope. When I look at that big lug in the picture up there, and even the relatively skinny one who sits behind me on the couch (that he knows he isn't allowed on but also knows because he's sick he can get away with it), I see my buddy.
I fostered Sammy and his litter of five kittens when they were 6 weeks old. A woman came into the animal rescue I volunteered for, while my husband was on his firs deployment, and told me her husband threatened to drown the kittens if she didn't find a home for them. I'm a sucker when it comes to animals in need. So even though I already had two cats, and even though there was a strict two-pet limit in my one-bedroom apartment, I took Sammy and his four siblings home.
Toby, Chloe, Twinkie, Lucky, and Sammy. They were tiny little bundles of fear and fur. I remember having to bathe them as soon as I brought them home. One woman giving five kittens a bath. I'll give you a minute to imagine that.

Yes. It was a challenge. Their claws were sharp, their voices loud, their eyes were gunked over from conjunctivitis. Two of them, Sammy and Twinkie - the two littlest - somehow crawled underneath the cabinets and I had to entice them with food to emerge. Oh, did I mention the fleas? Yeah. They had those too.
I loved every minute of it. I kept them in a big dog kennel when I was not home or asleep because kitten tornadoes can be quite destructive when not watched. They would play and play and play and then pass out in a giant puddle of kitty. Cutest puddle around. My older cats even got into playing with them. My best buddy, Al (a cat I grew up with) would hold them down and clean their ears.
The Hubbs came home to a house with 7 cats. He wasn't super thrilled, but... hello? Kittens! Who can stay mad?

One by one, the gang were adopted. All but Sammerton. He was mine for keeps.

Over the next few years, he became my buddy. Endless entertainment.  His weight grew higher and higher. He was always so sweet. He'd come to me when I was sad. He and my other kitty, Patches (Al had long since passed on) gave me someone to take care of while The Hubbs got deployed one and then two more times. Sam has moved with us four times. He's been through both pregnancies and my girls have always known him. He taught them both on different occasions why you don't pull cat's tails.

He snores, he sometimes drools, he sleeps on his back, he likes to sleep on my pillow (while my head is still on it), he is inexplicably good at photobombing, he's lazy, and can be a real asshole sometimes. He doesn't take shit from anyone and isn't afraid of the dogs or the kids or... really anything. Sammy does what Sammy wants, and I absolutely love that about him.

Yes. He is a cat, but he's not just a cat. He's my buddy, my Sammers, my responsibility. I will do everything I can to keep him happy and comfortable for as long as he lives.


Monday, October 6, 2014

Bubble Guppies Birthday! (or Underwater theme)


My now-three-year-old requested a Bubble Guppies party this year, and I was like - WHAT? No Disney-related themes?! Yup. It happened. Anyway, I found a lot of cute ideas on Pinterest, and put the easiest/best ones together.

Decorations:
*Banner

I made the banner with ipiccy.com and various pics from the interwebz. Printed it out, cut around them, hole punched in each top corner, then strung ribbon through. Super easy to do.
Needed: 

  • Computer with internet access
  • Basic idea of how to work picture editing sites like www.ipiccy.com or www.picmonkey.com.
  • Printer with color ink
  • Printer paper
  • Ribbon
  • Hole Punch

*Bubbles
I blew up light and dark blue balloons and taped them all over the ceiling. I didn't get any pics because I forgot (too busy with the party). 

*Seaweed
Didn't get any pics of this, either, so this isn't from our party
Pretty easy to do with green streamers.


Food:
*Shark Fruit Salad
This didn't turn out as cute as the one I saw on Pinterest. I think the mouth was too big for his face. But everyone got the idea and the point was made.

Needed:
  • Watermelon
  • Grapes
  • Strawberries
  • Knife
  • Tray
  • Two toothpicks
  • Blue Tissue Paper (if desired)
Steps: 
  1. Cut the base of the watermelon and scoop out the insides. I used a melon baller. Because I'm a baller.
  2. Then flip empty watermelon shell over onto the tray and cut the hole for the mouth, including jagged edges for the teeth. 
  3. Gently cut the dark part of the rind off each tooth.
  4. Refill the melon with watermelon, grapes, and strawberries.
  5. Take 2 grapes and two toothpicks to use for eyes.
  6. My melon was less than perfect on the outside. To hide the scratches, and sop up some of the juice, I cut blue tissue paper to look like "waves" and wrapped it around the base.

*Octopus Veggie Tray
We had a LOOOOT of sugary snacks. The veggies were a welcome addition to the sugar overload.
Needed:
  • Veggies of your choice
  • Veggie tray - preferably one with the middle bowl for dip
  • Veggie dip of your choice
  • One orange pepper
  • Two grapes
  • Two toothpicks
Steps:
  1. Wash all vegetables
  2. Fill center dip bowl
  3. Cut up and place all veggies except the orange pepper
  4. Cut the top off of the pepper
  5. Remove seeds 
  6. Make even slices up the sides of the pepper, creating 8 legs. I used only the front for legs and cut the back off entirely so it would lay right. 
  7. Take 2 grapes and 2 toothpicks to make the eyes.

*"Sushi"
These were messy to make. Twinkies are sticky. The kids enjoyed them, and parents got to once again try to remember why Twinkies are such a big deal.

Needed:
  • Ten Twinkies
  • Fruit by the Foot
  • Mini Swedish Fish
Steps:
  1. Cut the ends off each Twinkie and slice into thirds.
  2. Wrap each 1/3 of Twinkie in Fruit by the Foot. (The outside of the Twinkies are sticky enough that you shouldn't need it, but you can use frosting if you're having trouble getting the FbtF to stay on the Twinkie.)
  3. Place one Swedish Fish at the center of each 1/3 Twinkie.


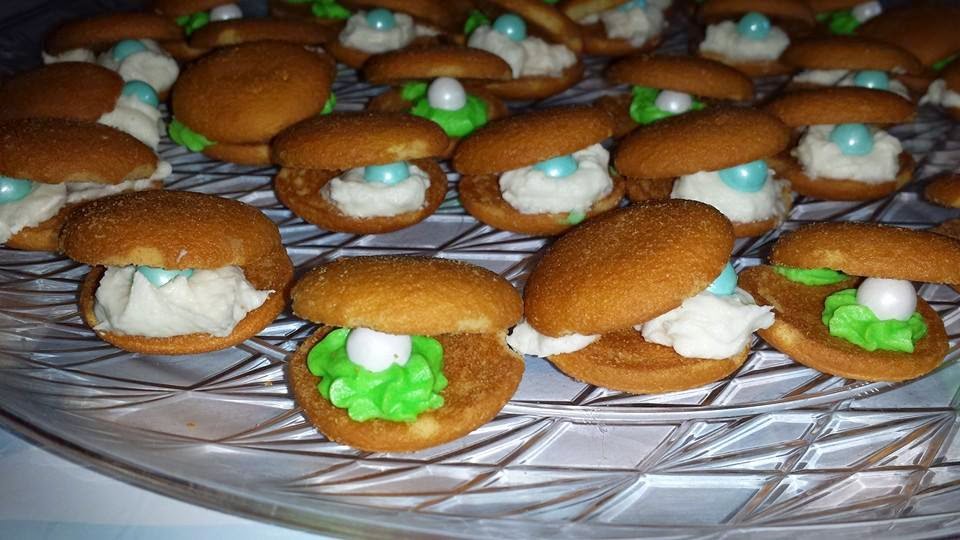
*Clams
Easy, cute, and yummy.
Needed:
  • Nilla Wafers
  • White Sixlets (can also be found at Joann's, most craft stores and Party City.
  • Icing (I used leftovers of the buttercream icing from the cake - I'll post that recipe below) in tubes - you could also just buy the premade icing.
Steps:
  1. Take one Nilla Wafer and squirt a glob of icing on the bottom, slightly off center, then a dab of icing at the opposite side.
  2. Place a sixlet in the glob of icing.
  3. Take second Nilla Wafer and put the base in the dab on the back, gently laying it over the "pearl."
*Fishbowl Marshmallows
I am just in love with the way these turned out. We hardly had any left after the party.


Needed:
  • Goldfish
  • Large Marshmallows
  • Lollipop Sticks
  • Blue Candy Melts  (Can also be found at any craft store, some grocery stores, and Party City)
  • White, round sprinkles (Can also be found at the places I listed above)
  • Graham Crackers
  • Wax Paper
  • Tray
Steps:
  1. Melt the candy melts in the microwave.
  2. Crush up graham crackers.
  3. Stick marshmallow on lollipop sticks.
  4. Dip marshmallow in the melted candy (be careful it isn't too thick or the marshmallow might fall into the bowl. I used a spoon to spread the candy evenly and make a smooth edge.)
  5. Dip bottom of the candy-coated marshmallow in the graham cracker crumbs.
  6. Place on wax paper covered tray.
  7. Stick one goldfish firmly on the side of the marshmallow.
  8. Take 3 sprinkles and place above the fish's mouth.
  9. The candy should be hard in 15 minutes or so, but you can always put them in the fridge or freezer to speed up the process.
*Fish 'n Chips
An easy, silly idea for one more snack.

Needed:
  • 1 bag of potato chips
  • 1 bag of Swedish Fish
  • 1 bowl
Steps

  1. Mix potato chips with Swedish Fish (duh.)

*The Cake


Needed:
  • 16 inch round cake pan
  • 9 inch round cake pan
  • Two boxes of cake mix
  • 4 cups of powdered sugar
  • 1 cup Crisco
  • 1 cup butter (2 sticks)
  • 4 tablespoons milk
  • 2 teaspoons vanilla extract
  • 1 teaspoon salt
  • Swedish Fish
  • Graham Cracker Crumbs
  • Bubble Guppies Toys 
  • Blue & Green Food Coloring
  • Icing bag and coupler
  • Round decorating icing tip
Steps:
  1. Mix one box of cake batter as directed.
  2. Pour into greased 16 inch pan and bake as directed.
  3. When it's finished, stick pan in freezer to cool. This helps keep it moist.
  4. Mix second box of cake batter as directed.
  5. Pour into greased 9 inch pan and bake as directed.
  6. Stick pan in freezer. Time to make the icing.
  7. Put 4 cups of powdered sugar, 1 cup of crisco, 2 stick of softened butter (I use salted), 4 tbsp of milk, 2 tsp of vanilla extract, and 1 tsp salt in a bowl and mix well
  8. Check 16 inch cake to be sure it's cooled and then flip over on cake tray.
  9. Spread icing (using white is fine) evenly over the entire base, then sprinkle graham cracker crumbs, covering the whole thing.
  10. Separate the remaining icing into two bowls - about 1/3 to 2/3 ratio. Mix green food coloring into the lesser one and blue into the other. Put the green icing into the icing bag.
  11. Check 9 inch cake to be sure it's cooled. Flip over onto center of the 16 inch cake.
  12. Using a serrated knife, slice the top of the 9 inch cake to be sure it's flat.
  13. Ice entirely in blue icing.
  14. Make green "seaweed" with the green icing.
  15. Decorate with Swedish Fish, Bubble Guppies toys, and white sprinkles (the ones you used in the Fishbowl Marshmallows)

Favors:
*Bucket
For the "bags" I used buckets. I tried to find sand pails, but Party City didn't have enough, and with it being the end of the season, I couldn't find them anywhere else. I think it still worked.


*Sea Creature Lollipops
My husband just loves making these candy melt lollipops. I gave him a challenge this time.
There were other shapes too. There is also a fish and a sea star but dumb me forgot to take pics before the party, so these were the extras left. 
Needed:
  • Sea Creature Lollipop Mold
  • Orange, Yellow, Gray, Green, Brown, Blue, White, and Black candy melts. Craft stores have all these colors.
  • Lollipop sticks
  • Lollipop Bags and twisty ties (or you could just buy this and get them together)
  • A small paintbrush
  • Patience!!
Steps:
You basically have to do each and every color after the other dries. It doesn't take long, but can be frustrating. 

*Fish Food
Needed:
  • Computer (I made the labels on www.ipiccy.com)
  • Printer
  • Printer paper (I find a nice, thicker paper is best)
  • Stapler
  • Clear baggies, like this
  • M&Ms
Steps
  1. Make labels and print.
  2. Cut each label with an equal amount of white space at the top of the picture.
  3. Fill baggie
  4. Fold label over the baggie - I find it's easiest to seal if you fold the top of the baggie a bit too. 
  5. Staple
*Goldfish
Needed:

Needed:

*Octopops
Needed:
  • Various colored tissue paper
  • Various colored pipe cleaners
  • DumDum lollipops
  • Sharpie
  • Glue
  • Small Googly Eyes
Steps:
  1. Cut a small bit of tissue paper in a square and wrap around the lollipop wrapper.
  2. Cut an inch off of 4 pipe cleaners, then wrap them each around the base of the lollipop.
  3. Use sharpie to make a mouth
  4. Put a tiny amount of glue on each googly eye and paste.
*Bubbles

Needed:
  • Small container of bubbles
  • Computer (again, I made the labels on www.ipiccy.com)
  • Printer
  • Printer paper (thinner paper here)
  • Hot Glue Gun (I didn't get to use it nearly enough with this party!)
Steps:
  1. Print labels (for these bubbles, they were approximately 1" tall and 3" long)
  2. Cut labels
  3. Glue labels on

All in all, it was a blast to prepare. E had a great time, and even A and the other older kids enjoyed some of the silly stuff. 


Monday, July 14, 2014

I had a dream about you...

Last night, I had a dream I saw you. It's been over six months since your text. You know the one. Though I think about you sometimes, I'm not sure why last night my mind needed you to manifest. Maybe it's because I was on vacation, remembering the times we went away together. For whatever reason, I had a dream about you.

I ran into you, and at first it was awkward, as I imagine it would be in real life if we were to see each other. But then something unexpected happened. You apologized. And, oh my god. How I needed to hear that apology. You told me you'd made a mistake. That you've missed my presence in your life. Because we were good friends, despite our few differences.

Or maybe those differences weren't so few. You certainly didn't seem to think so. Instead of talking to me - giving me the respect I feel I'd earned as your friend - you ceased communication, and then cited the one major difference between us as your reason for ending the 2+ year friendship.

You were there for me during the worst part of my life, offering support and advice and not judgment. For that I'll always be grateful. I think I helped you a lot as well, during a difficult time in your life. I hope I helped you. I know you helped me.

So in my dream, when you apologized, I felt so much joy. Despite what I say to myself and others, that I don't care about you - that you're treatment showed me you weren't as great of a friend as I thought you were - I know I'm lying. I don't know, if you were to apologize in real life and want to start our friendship anew, what I'd say. In my dream, I accepted, and I was glad I had.

Maybe I dreamed this because I've been dying for an apology. An explanation beyond the cold, callous one you gave me. I thought, at the very least, our friendship had warranted that. More than all the other shit I went through last year, this one hurts - if not the most, then almost as badly. Because you knew everything else. You knew and you still treated me like I didn't matter to you. You didn't give me the benefit of the doubt, and because of that, I know you didn't value our friendship the way I did.

Maybe this is a pathetic way to get this out there. I'll take that risk. Because I really cared for you, for your husband and your kids. And I thought what we had was worth talking about, one last time.

Wednesday, May 14, 2014

It's a Frozen Party (not literally frozen, just Frozen-themed)

Like most young girls ages 1-10 years, my daughters have taken flying leaps onto the Disney's Frozen bandwagon. They're standing proud and tall with millions of other Elsas and Annas singing "Let It Go" at the tops of their lungs!
My now-six year old requested a Frozen birthday party this year. And no matter how often I tried to distract her by saying things like, "A Frozen party? Won't that get cold?" she would not be deterred. So I set out on a mission to figure out how I can make a Frozen party, at a park, in May.
Here's what I did:

Favors:
*Do You Wanna Build A Snowman?

I found this idea on Pinterest (like, pretty much, everything else on here) and made my own picture.
Needed: 

  • 3 big marshmallows
  • 2 pretzel sticks
  • 1 candy corn 
  • several miniature chocolate chips (I admit I didn't count these out, just added roughly the same amount to each baggie. They're very melty.)
  • Treat Bags like this.
  • Printer
  • Cardstock quality paper
  • Stapler
*Ice Candy
Yup, that's good old fashioned rock candy. No, I didn't make it myself, but if you're keen, here's a link to a recipe and how-to. Looked like WAY too much of a mess for me, so I bought it.
Needed:
  • Rock Candy (duh). I found it at Party City for the cheapest. It's a true sign of how big of a PITA it must be to make when most places charge a buck a piece! Party City has it at 8 for $6. They have a lot of colors to choose from. Mine didn't have the light blue so I went with dark blue and white/clear. 
  • Again, you'll need the treat baggies
  • Stapler
  • Printer
  • Paper (Oh and I use www.ipiccy.com for all the designing of labels.)
*Snowballs
Needed:
  • White Sixlets (I was cheap and only put 18/bag. Let's face it, my kids didn't need anymore candy that close to Easter, and I'm guessing they weren't the only ones.)
  • Clear treat bag
  • Printer
  • Staples
  • Paper
*Bows


These were only for the girls, and made by yours truly. The boys got sunglasses - I was reaching for the Olaf/Summer thing. Hush. These were the most time-consuming of the favors.
Needed:
  • Ribbon, varying colors
  • Alligator Clips 
  • Hot glue gun (LOVE getting my glue gun out!)
  • Any beads or accents you'd like to include. I got the pearly-type one and the diamondy one from a page of stickers found in the scrapbook section of my Joanns.
Instructions on how to make the bows are in another part of my blog. Here at the top, is the first part, then this particular look is shown at the bottom of the page. 

*Snowflake Lollipops
These were easy-peasy. Just your typical melted candy deal. 
Needed:
  • Snowflake Lollipop Mold (could only find this on amazon)
  • Lollipop Sticks (these are easily found in grocery or craft stores)
  • The plastic treat baggies, bigger this time. A lot of the lollipop sticks come in kits including the twisty-ties and baggies. I'd get those if you can find 'em.
  • Blue and White Candy Melts (I found "stark white" at Joanns and think they looked better. The regular "white ones are really off-white." I think these can all be found cheaper in stores, anyway.)
Also included were stickers (holy crap, the price on those went up drastically since I purchased them!) 

I put them in plain white bags and added a little fancy ribbon. 

Activities: 
Well, we were at a park, so there was the playground equipment that kept the kids entertained mostly. I did have my wonderful husband draw Olaf on a poster, and we printed and cut out carrot noses to play Pin the Nose on Olaf.

 
Food:
We ordered pizza, since it was a lunchtime party. I also had veggies and dip. 
I included a "Frozen" mix of pretzel sticks, mini marshmallows, candy corns,(I ad-libbed the candy corn and marshmallows) and white and blue M&Ms. That was quite a hit.
I made an "ice cap punch" like this, only not as fancy and in one big bowl.
And, of course, there was cake.
That looked roughly like this inside (it's a different cake, from a different party - don't your kids have multiple parties? - and the lighting is effed because I took the pic on my phone)

And cupcakes.

Decorations: 
*I didn't do much beyond the balloons and streamers. I got this disposable snowflake tablecloth (note: it did not cost $248... I don't know WTF that's all about!). 
*I am so mad at myself for not getting a picture of the little snowflake hangings I did! They were a huge undertaking, and I wound up not making as many as I'd hoped I would. Anyway, I bought this guy, cut a billion little snowflakes out and hot glued them to fishing line, before attaching it all to thick ribbon and then hanging them along the edges of the pavilion. The little snowflakes clung together and were a royal bitch to untangle. If I had to do it again, I'd get a bigger die-cut. Not even sure many people noticed the hangings.
*I made this
with my printer, different edged scissors, a hole-punch, and ribbon. (Doesn't it look so lovely on the door with the big padlock? Uhg.)


Because no one can find an Elsa dress for less than a gajillion dollars, thanks to all the assholes that buy them and then resell at 3xs the retail value (seriously, stop it.), and because my mom is awesome, she made A her very own custom Elsa gown. 
I think it turned out quite nicely.

We, of course, had to get E an Anna dress (much easier to find!).
There are my Frozen girls. :) 


Wednesday, January 22, 2014

Banana Nut Muffins - Vegan

Preheat Oven to 350°F

Mix together:
1/2 cup shortening
3/4 cup sugar
1/2 cup applesauce
2 1/2 mashed, slightly over-ripe bananas
1 teaspoon vanilla extract
1 1/2 cups flour
1/2 teaspoon baking soda
1/2 teaspoon salt
1/2 cup quick oats
1/2 cup nut of your choice (I used crushed, unsalted pistachio nuts)

Pour into greased muffin tin

Bake for 15-20 minutes, or until golden brown

Let cool and enjoy!!