
Friday, May 31, 2013
Wednesday, May 15, 2013
Seven [attempted] Acts of Kindness
A lot of people in my town are participating it displaying seven random acts of kindness today as a way to celebrate the seventh birthday of a little girl who died alongside her 5 yr old sister this past February. Even though I didn't know the family personally, we had a lot of common friends and, as a mom, I feel horrible for their losses.
So when I received the Facebook invite to the Seven Acts for Sophie, I was happy to add my name to the "attending" list. I always try to commit random acts of kindness in my daily life. Even something as simple as holding the door open for a mom with a stroller full of kids can perk up someone's day (trust me, as the mom with the stroller full of kids, it's appreciated more than you could guess).
The day arrived, and I won't lie and say I did much pre-planning. I had a general idea of things I wanted to do, though.
#1
After the biggest monster went to school, I called and scheduled an appointment with the Red Cross to donate blood. Then the little monster and I headed off to the donation center.
We got there on time, checked in and took a seat. And waited. And waited. And... oh yeah. Waited. Finally, 45 minutes after my appt time, I asked how much longer it would take. To which the lab tech replied, "30-45 more minutes". Needless to say...

#2
I'd gathered a bag of canned and boxed goods, with the intention of dropping it off at the local food bank. I park, lug the little monster out of the car, and get to the door... only to find it locked. I knocked and waited around, but no one ever came. I'll deliver them later.

#3
As E grew out of clothing, I'd put it in a comforter bag. Since today is a day for kindness, I decided to take it to the Planet Wear donation bin. I stick it in the top of the bin, push it closed... aaaaand it's stuck.


#4
After the clothing/not fitting debacle, E and I decided to take a nap. Then it was time to pick A up from school. I needed to go to Target, and the only way I can survive Target with two children is by going to Starbucks first. I had the intention of paying for the car behind me's order as well (even said that when I "checked in") but then the poor woman just in front of me accidentally rear-ended the person in front of her. She was a mom, had a baby in her car and I could tell she was flustered. I thought...

to really make a difference.
I tell the barista working the drive thru (did I mention I was in the drive thru? That might've been important) and he said it was fine. She gets her free whatever and as I'm pulling up I realize....

I don't have my wallet.

I get to the barista (BTW, they know me there so this is extra embarrassing) and apologize eight ways from Sunday, promise that I'll run home and get my wallet. Thankfully, he didn't call the cops. Off I sped - have I mentioned that I live on the other side of town? 1/2 hour later, I returned, wallet in hand.
So for acts #5-7, I will be staying hiding inside, safely making donations.

I don't regret one failed attempt at kindness. Sometimes shit happens and you have to laugh at it and move on. These were minor annoyances and if I made just one person's day a little brighter (hopefully the starbucks chick), then it was all worth it for the memory of a sweet little girl.
How to throw a Brave party...
For my oldest's 5th birthday, she requested a Brave party. While Disney has made some plates, napkins, favors and cups with Merida on them, the rest of the Brave collection pales in comparison to the other Princesses. So I decided to poke around on the old interwebs and here is what I did, as well as other ideas I found.
FAVORS:
I went simple for the favor bags. Dark blue paper gift bags from The Dollar Tree, and a printed tag on each one.


Inside the bags:
When you think about Merida, you think about her bow and arrows. Instead of making each kid a bow out of PVC pipe like this (that was WAY too ambitious for me, but looks super-cute), I decided to go smaller and found tiny bow instructions, using popsicle sticks (I bought the jumbo-sized ones since they seem a little sturdier), fishing line, a little hot glue and long q-tips for the arrows.
Supplies needed:
* Found theses Jumbo Popsicle Sticks (craft store, drug store, or Amazon)
* I bought these 6" wooden Q-tips (found in drug stores or, like me, purchased off of Amazon)
* This spool of Clear nylon fishing line (found at any craft store in the jewelry section or sports stop in the fishing/hunting goods, or you can buy on Amazon)
Here is the link for the Tiny Bow Instructions.
I decorated the bows with simple designs drawn on with markers. I cut the arrows down to about 5" each and created a groove in the bottoms of each of them so they'd fit nicely on the string. I also drew a line in each groove so it could be seen better.


I found dark brown Teddy Grahams, Black Cherry gummy bears, and chocolate covered raisins. I created (via ipiccy.com and pizap.com) tags for them each (feel free to steal).


I also put Brave Fruit Snacks in the bags

The kids also got Brave Stickers (found at party stores, or online)
ACTIVITIES:
In keeping with the archery theme, I decided to make a target out of felt. My daughter has a Merida Bow & Arrow Set and I bought some Adhesive Velcro Tape and stuck it on the ends of the suction cups. The adhesive is sticky enough on it's own, so no additional glue should be needed.
Suggestion: Use some extra "pokey side" velcro to run over the felt target to get it ready for the arrows. Otherwise, I found the arrows did not stick well.
Needed Supplies:
*Big sheet of white felt, red felt, blue felt, and black felt - can be found at any craft store.
*A bow and arrow set like this or the Merida one.
*You can buy extra arrows online.
*Hot glue.
I also suggest you use a stencil. My target looked more oval and less circular (like Merida's was).

Bears play a big part in Merida's story, and I thought incorporating that, as well as bringing the witch's side job - wood carving - into the mix would be fun. I found these Bear Claw Necklace Kits. So the good news with these is that there are six bear claws in each kit. I went to the craft store and bought string and extra beads and then allotted each kid one bear claw.


Supplies Needed:
*Synthetic Bear claws
*Assorted beads - I used these from Joann
*Simple elastic stringing cord
Along with her bow, Merida is often seen riding her Shire horse, Angus. To bring the gelding into the party, I decided to do a Pin the Tail on Angus game. My husband gets most of the credit - okay, he did everything except buy the materials and think up the idea. He's a bit artsy and printed a picture of Angus out, drew grid lines on it and then did the same to a white poster board. It was all very Children's Activity Book, but genius nonetheless and saved us a bundle. For the tails, he simply cut them out of black poster paper.


Supplies Needed:
*Picture of Angus
*Pencil
*Ruler - one shaped like an L would be best
*White poster board
*Black poster board
*White eraser (to get rid of the graph lines after you've done the drawing)
*Black, fine-tipped sharpie (to darken the outline)
You could also color him in. My husband opted not to, though I still wish we had.
TREATS:
Since it was an afternoon party, we just had snacks (chips, humos, salsa, veggies, and drinks), along with a cake, cookies and cupcakes (in case there wasn't enough cake).
The cookies were made to look like targets with arrows in them.


To make the "arrows", I used regular wooden toothpicks. I cut triangles into red posterboard and hot glued the triangles onto the base of the toothpick.
For the cookies, I made simple sugar cookies. Be forewarned - that recipe makes a whole lotta dough!
I rolled them out and used a circle cookie cutter to make the targets.
While they were baking, I made this icing, which I love because it dries fast and hard and is even a little glossy. I made black, blue and red, leaving some white as well. I used icing bags to pipe the designs, working from outside in.
Supplies Needed:
*Tooth picks
*Glue gun
*Red poster board
*Ingredients called for in sugar cookie recipe and icing recipe
*Icing bags
*Blue, red, black food coloring
*Circular cookie cutter
The cupcakes, I made from the box and icing from the box, nothing fancy except I put them on a cupcake stand painted to look like a castle.
Here is the plain white cupcake stand. And this is what it looked like when I was finished.
 I painted the entire thing with gray acrylic paint and once it dried, I used a black sharpie to create the "bricks" and then assembled it. Simple, cheap, and a heck of a lot easier than making fancy-dancy cupcakes.
Supplies Needed:
*White cupcake stand - can be found online or at any craft or party store
*Gray acrylic paint
*Black sharpie
A friend of mine made the cake (she's phenomenal).


DECORATIONS
I didn't do much in the way of decor. Just blue and purple streamers, light blue balloons and, I found the idea to make wisps out of ground stakes.


I cut holes in the middle of a square of cellophane for the stake to go through, then gathered it at the top and closed it with a twisty tie.
Supplies Needed:
*blue cellophane
*Ground stakes
*twist ties
FAVORS:
I went simple for the favor bags. Dark blue paper gift bags from The Dollar Tree, and a printed tag on each one.

Here is a close up of the tag

I wrote out the names on each bag, and attached plaid ribbon (blue for boys, red for girls) on the handles.
When you think about Merida, you think about her bow and arrows. Instead of making each kid a bow out of PVC pipe like this (that was WAY too ambitious for me, but looks super-cute), I decided to go smaller and found tiny bow instructions, using popsicle sticks (I bought the jumbo-sized ones since they seem a little sturdier), fishing line, a little hot glue and long q-tips for the arrows.
Supplies needed:
* Found theses Jumbo Popsicle Sticks (craft store, drug store, or Amazon)
* I bought these 6" wooden Q-tips (found in drug stores or, like me, purchased off of Amazon)
* This spool of Clear nylon fishing line (found at any craft store in the jewelry section or sports stop in the fishing/hunting goods, or you can buy on Amazon)
Here is the link for the Tiny Bow Instructions.
I decorated the bows with simple designs drawn on with markers. I cut the arrows down to about 5" each and created a groove in the bottoms of each of them so they'd fit nicely on the string. I also drew a line in each groove so it could be seen better.


I'm pleased to say that these little suckers shoot pretty darn well, too!


I printed them out on card stock and then (after adding the goodies to the bags) folded the tags in half and stapled them closed.
The end results looked like this:

chocolate covered raisins

teddy grahams

black cherry gummy bears
Supplies needed:
*Assorted goodies
*Card stock paper
*Printer
*Scissors
*Stapler
*Treat bags like this. (found at any craft store)
I also put Brave Fruit Snacks in the bags

ACTIVITIES:
In keeping with the archery theme, I decided to make a target out of felt. My daughter has a Merida Bow & Arrow Set and I bought some Adhesive Velcro Tape and stuck it on the ends of the suction cups. The adhesive is sticky enough on it's own, so no additional glue should be needed.
Suggestion: Use some extra "pokey side" velcro to run over the felt target to get it ready for the arrows. Otherwise, I found the arrows did not stick well.
Needed Supplies:
*Big sheet of white felt, red felt, blue felt, and black felt - can be found at any craft store.
*A bow and arrow set like this or the Merida one.
*You can buy extra arrows online.
*Hot glue.
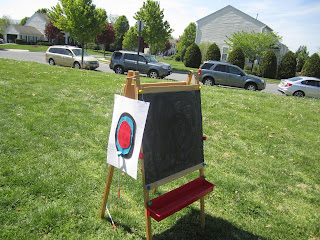
I also suggest you use a stencil. My target looked more oval and less circular (like Merida's was).

As you can see, our party was outside so I used our easel to hold the target up.


*Synthetic Bear claws
*Assorted beads - I used these from Joann
*Simple elastic stringing cord
Along with her bow, Merida is often seen riding her Shire horse, Angus. To bring the gelding into the party, I decided to do a Pin the Tail on Angus game. My husband gets most of the credit - okay, he did everything except buy the materials and think up the idea. He's a bit artsy and printed a picture of Angus out, drew grid lines on it and then did the same to a white poster board. It was all very Children's Activity Book, but genius nonetheless and saved us a bundle. For the tails, he simply cut them out of black poster paper.


Supplies Needed:
*Picture of Angus
*Pencil
*Ruler - one shaped like an L would be best
*White poster board
*Black poster board
*White eraser (to get rid of the graph lines after you've done the drawing)
*Black, fine-tipped sharpie (to darken the outline)
You could also color him in. My husband opted not to, though I still wish we had.
TREATS:
Since it was an afternoon party, we just had snacks (chips, humos, salsa, veggies, and drinks), along with a cake, cookies and cupcakes (in case there wasn't enough cake).
The cookies were made to look like targets with arrows in them.


For the cookies, I made simple sugar cookies. Be forewarned - that recipe makes a whole lotta dough!
I rolled them out and used a circle cookie cutter to make the targets.
While they were baking, I made this icing, which I love because it dries fast and hard and is even a little glossy. I made black, blue and red, leaving some white as well. I used icing bags to pipe the designs, working from outside in.
Supplies Needed:
*Tooth picks
*Glue gun
*Red poster board
*Ingredients called for in sugar cookie recipe and icing recipe
*Icing bags
*Blue, red, black food coloring
*Circular cookie cutter
The cupcakes, I made from the box and icing from the box, nothing fancy except I put them on a cupcake stand painted to look like a castle.
Here is the plain white cupcake stand. And this is what it looked like when I was finished.

Supplies Needed:
*White cupcake stand - can be found online or at any craft or party store
*Gray acrylic paint
*Black sharpie
A friend of mine made the cake (she's phenomenal).


DECORATIONS
I didn't do much in the way of decor. Just blue and purple streamers, light blue balloons and, I found the idea to make wisps out of ground stakes.


Supplies Needed:
*blue cellophane
*Ground stakes
*twist ties
Subscribe to:
Posts (Atom)